
About the authorMy name is Marquise Deal, sophomore at Durham School of the Arts.
Disclaimer: " views and opinions expressed in this blog are solely those of the author and do not represent those of Durham School of the Arts or Durham Public Schools.")
|
|
This week I worked a 3D modeling project with a lot of freedom. I decided to create a modernized lamp. I referenced it to a lamp I found on google with holes in it, as well as a box/spherical body to it. Immediately I knew I had to use a box primitive and turn it into a editable poly and then add the spherify modifier. Then modify it into a sphere. Then I Ctrl-clicked out a pattern and once I did that all the way around the sphere. Once that was finished I extruded it inward to create that hole effect. Next I had to add the actually lamp part. So the last primitive I used was the cylinder. I made one with the dimensions so It was real tall and skinny. That resembled the lamp rod. Then lastly I need to make a lamp cover. So I made another cylinder and scaled that one to be a little bit larger. This was my final product. 
0 Comments
This week in class, we begun modeling in 3D studio max. We built a snowman and started working on a pencil. I learned all the tools necessary to make the basic things in the application such as, making the 3D objects, scaling & rotating and working on the x axis, y axis and z axis. When building the snowman you had to use 4 type of objects. The sphere, cone, box and cylinder. You wanted to first stack the spheres to make the snowman's body. You want to set the coordinates to 0, 0 and 0. Then move the spheres up on the Z axis. That would make then look like they were on top of each other like in image 1. Secondly the snowman needs buttons so you would want to draw out more spheres but then scale them down so they are small like buttons are. Then you want to set their coordinates to 0, 0 and 0 by right clicking on the X, Y and Z at the bottom. Then you want to pull them forward using the Y axis, so that they're visible. Repeat that until you have 3 buttons. Then you want to do that again for the eyes but gives the eyes some space. Now draw out your cone for the nose and set its coordinates to 0,0 and 0. Then bring it forward on the y axis so that it is visible just like you did for the buttons and eyes. Once your finished you should have a basic snowman just like image 2. You can add arms and a hat with playing around in the box object and cylinder object. In conclusion;
References; https://www.youtube.com/watch?v=FjcFmptG2zw 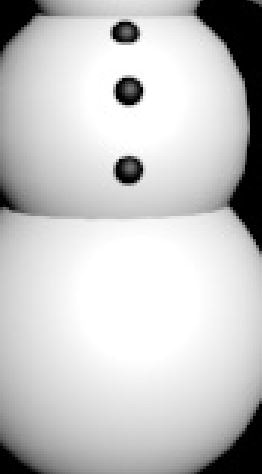 |
